> ## Documentation Index
> Fetch the complete documentation index at: https://docs.decodahealth.com/llms.txt
> Use this file to discover all available pages before exploring further.
# Ingenico Link/2500
> Setup guide for the Ingenico Link/2500 portable payment terminal.
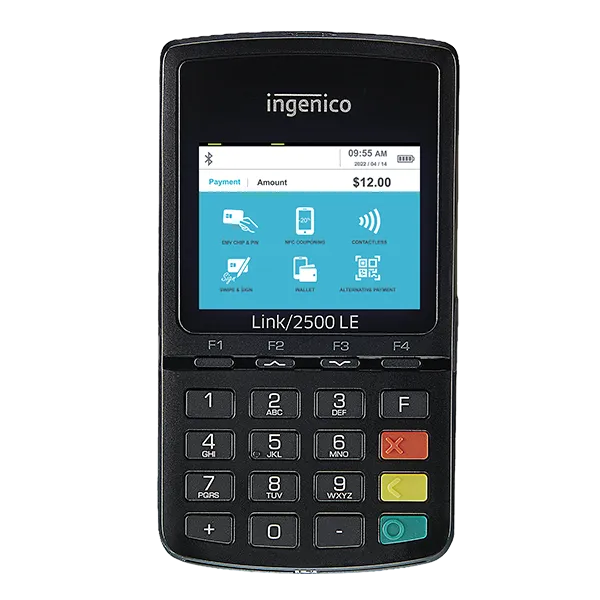 ## Setting Up the Device
Power on the device by holding the **Green button**.
## Setting Up the Device
Power on the device by holding the **Green button**.
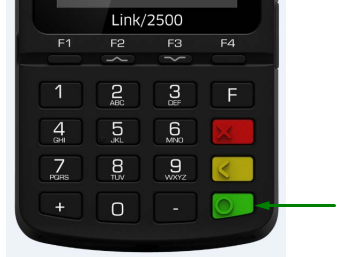 If the device does not power on, ensure the device is fully charged with the USB-C cable provided with the reader. **Note:** On initial start-up, you must charge the battery for 16 hours.
After the device is powered on and if it displays a **Cloud / Disconnected** message, please continue with the next step.
If the reader displays the Serial Number, Unregistered, and a Registration Code, this indicates your device is already configured and you can skip to the last step.
Using the reader PIN pad, enter `0001`. This will take you to the Admin Menu.
Using the **F2** and **F3** function keys to scroll, select option **1 - Communication Type** then within that menu, select option **4 - WIFI**. Navigate back to the Admin Menu using the **Yellow back button**.
In the Admin Menu, select option **2 - WIFI Parameters**, then in that menu, select option **2 - Scan Networks** to search for networks nearby. Once the scan is completed, you will see a list of networks available.
Select the network you wish to configure your device with and enter the network password if requested. Once connected, you will see a **New Profile OK** message and return back to the Admin Menu.
To confirm if the device is connected to the network you previously selected, navigate to option **2 - Wi-Fi Parameters** in the Admin Menu, then option **3 - My networks**. Here, you will find a list of all previously saved networks. If the previously selected network is online, the word **connected** will be under the network name.
You can exit the Admin Menu by using the back (**Yellow** button) or using the cancel (**Red** button).
If this is the first time setting up the device with a Wi-Fi network or a code is not shown on the device, you may need to restart the device: hold the `-` button (left of the Green button) and the Yellow button (above the Green button) at the same time until the "Shutdown In Progress" screen is shown (about one second). You will need to power the reader again by following Step 1.
When connected, the WiFi symbol will show connected and green on the top left. The code displayed on the screen is the Registration Code. Use this code when [registering the device](/modules/settings/payment-management#register-a-new-device) in Decoda.
## Resetting the Device if Disconnected from Wi-Fi
If your Link/2500 device becomes disconnected from Wi-Fi, you can reset it by pressing the **Yellow** button and the pound sign `#` button at the same time. This will reset the device and allow it to reconnect to Wi-Fi.
If this issue persists, reach out to Decoda Support.
If the device does not power on, ensure the device is fully charged with the USB-C cable provided with the reader. **Note:** On initial start-up, you must charge the battery for 16 hours.
After the device is powered on and if it displays a **Cloud / Disconnected** message, please continue with the next step.
If the reader displays the Serial Number, Unregistered, and a Registration Code, this indicates your device is already configured and you can skip to the last step.
Using the reader PIN pad, enter `0001`. This will take you to the Admin Menu.
Using the **F2** and **F3** function keys to scroll, select option **1 - Communication Type** then within that menu, select option **4 - WIFI**. Navigate back to the Admin Menu using the **Yellow back button**.
In the Admin Menu, select option **2 - WIFI Parameters**, then in that menu, select option **2 - Scan Networks** to search for networks nearby. Once the scan is completed, you will see a list of networks available.
Select the network you wish to configure your device with and enter the network password if requested. Once connected, you will see a **New Profile OK** message and return back to the Admin Menu.
To confirm if the device is connected to the network you previously selected, navigate to option **2 - Wi-Fi Parameters** in the Admin Menu, then option **3 - My networks**. Here, you will find a list of all previously saved networks. If the previously selected network is online, the word **connected** will be under the network name.
You can exit the Admin Menu by using the back (**Yellow** button) or using the cancel (**Red** button).
If this is the first time setting up the device with a Wi-Fi network or a code is not shown on the device, you may need to restart the device: hold the `-` button (left of the Green button) and the Yellow button (above the Green button) at the same time until the "Shutdown In Progress" screen is shown (about one second). You will need to power the reader again by following Step 1.
When connected, the WiFi symbol will show connected and green on the top left. The code displayed on the screen is the Registration Code. Use this code when [registering the device](/modules/settings/payment-management#register-a-new-device) in Decoda.
## Resetting the Device if Disconnected from Wi-Fi
If your Link/2500 device becomes disconnected from Wi-Fi, you can reset it by pressing the **Yellow** button and the pound sign `#` button at the same time. This will reset the device and allow it to reconnect to Wi-Fi.
If this issue persists, reach out to Decoda Support.